Thursday 29 March 2018

Zombicide Season 1 Campaign - Boomtown 02

Mission 02 Doug's Secret Cashes

...carrying on from Part 1 here 

So with my newly painted Zombivores it was time to get into Mission 2 of my Boomtown Campaign.  For a mission rated "medium" it was very tough indeed! Oh and Zombivores are awesome and much needed!

Objective - simple... collect all the X marked objectives and carry them to the exit zone.  They are bombs and take up 1 inventory slot.  The Abomination does not spawn, instead he is the blue objective which will be revealed each time I flip a red objective.

Table set up and ready to rock

Split the forces up, south force was to gear up whilst the top force was to level up

Top force draws the crowd

Amy gets surrounded

Wanda zooms in to help Amy

Meanwhile Josh loots some Gasoline.  In this scenario there is only one Abomination
who is hidden among one of the objectives. I needed to prepare for the eventual
revealing of the Abomination

Things looking grim for the girls

Josh collects the lighter to make a molotv :) I can now collect the objectives
knowing I can kill the abomination.

Amy and Wanda Fall! Phil can't save them!

First time I have ever played with a Zombivore, Amy gets back up, this time with
5 wounds as a Zombivore

Wanda and her chainsaw resurrect as a Zombivore

The zombi girls make swift work of anything that gets in their path

Getting ready to take an objective

Wanda gets a molotov, thats 2 now!

Amy kills so many zombies she races to red level! insane spawning begins!

This is not looking good! Zombies Everywhere!

The girls clear the path making my way to the final two objectives... Abomination
yet to be revealed!


Amy needed to step up with her chainsaw, this is the roll! I needed
5+ to kill! Boom!

Clearing the final building.  The first objective reveals nothing.

...and of course the final objective in the game is the blue token, revealing the
Abomination! Lucky Josh was there with his Molotov! Boom!

Every character is now in the red level, spawning is getting insane, I got to fight
the horde off then time my run to the finish

A very very tense moment.  Josh was armed with a sniper rifle and picked off
some Fatties that needed to die as I feared the "extra activation" mechanic
if I ran out of models for them.  Meanwhile look at those runners piling in.

Breathing space! Time to run!

The heroes run to the exit.  Wanda nearly dies just below them, silly move but through
sheer luck she survives!

We made it! Amy and Wanda fell but will join us in mission 3 as Zombivores!

Well what a game! It nearly took 4 hours! It was absolutely epic.  Zombivores are so powerful with their 5 wounds as opposed to 2 wounds that normal survivors have.  I really have the feeling all my characters are going to end up as Zombivores if I am to win this campaign.  For a "medium" game this was damn tough!

See you for mission 3!


Don't let your 3D prints get exposed to the harsh Aussie Sun...

Well lesson learnt! Whilst waiting for the varnish on the roof of this print to dry the harsh 28 degree Aussie sun warped it!!! It drove me mad with this minor imperfection.  DONT LEAVE YOUR PRINTS IN THE SUN!

After trying boiling water and a hairdryer I couldnt restore it.  I decided to sand it flat and the roof now sits flush again but if you look carefully you can see the warping in the roof!

The print is from 3D Print Terrain and is from their Italy/Spain kickstarter.  I upscaled it to 127% for 1/56 wargaming.

I textured the print with sand.

I started sanding the roof flat and you can see the warping when the paint was removed!

After sanding, looks nice and flat again, you can notice the warping if you look carefully.


The warping is very noticeable here!

I was most impressed with just how durable this thing is.  I bashed the crap out of it, bent it, twisted it and handled it heavily.  Not one bit of paint chipped or flaked off during this process.  Safe to say Rustoleum is an exceptionally good primer. 

Zombicide Season 1 Survivors, Zombivores and a Black Plague Necromancer.

March certainly has been a great month for me with 65 figures painted, granted most are for Zombicide.  My latest editions are the Zombivores from Zombicide Season 1 and a Necromancer for Black Plague.  I have never really shown off my Season 1 Survivors so I have posted them next to their Zombivore equivalent.

Zombies aren't meant to be clean so you can see there is a very contrasting paint job when it comes to my Zombivores.

Zombicide Wanda Zombivore
Wanda
Zombicide Phil Zombivore
Phil our fearless leader, very Rick Grimes looking


Zombicide Josh Zombivore
Josh, one of my favorite sculpts

Zombicide Doug Zombivore
Doug... Falling Down!

Zombicide Ned Zombivore
Ned, my favorite Psychopath

Zombicide Amy Zombivore
Amy

I did a quick paintjob on the Zombivores as you can see, I just wanted to get them on the table.  Speaking of quick paint jobs I also wanted to get my Black Plague core set complete, just 6 survivors to go now that I got the Necromancer done!  I didnt want to spend too much time on him but he came out great.

Zombicide Black Plague Necromancer Painted
I really like the Blue and Red scheme, might use this for Gangs of Rome

Zombicide Black Plague Necromancer


Thursday 22 March 2018

A Normandy Terrace and a Field

I have made some terrain over the past week.  I finally put together my Knights of Dice Letters Home Normandy Terrace 1.  This is a great kit however I am not a fan of MDF.  I find it fiddly and awfully time consuming.  It is fairly fragile too in comparison to a 3D Print.  You can get some great stuff in MDF and I still have much to build however I am a complete 3D Printing convert for buildings.  I rather get a file, slice it and go and do other things with my time than build a MDF kit... but thats just me.

I do want to give some praise to Knights of Dice though, their owner Vivek is committed and passionate about his kits and for MDF they are absolute top quality.

The Knights of Dice assembled kit next to a 20mm WW2 3D printed
terrace by 3D Print Terrain (I went all in on their kickstarter)

Base coated, I used Rustoleum Texture Paint for the sides.
I also built an experimental field using some canvas and acrylic caulk.  I got the idea from Wargaming With Silver Whistle and his Book Setting the Scene.  It was pretty straight forward and now I know how to apply his techniques I intend on making more of these scatter pieces of terrain.

caulk terrain tile
The canvas caulked and dusted with sand

acrylic caulk terrain
Primed brown, coffee grains for soil, drybrushed and vegetation added.
I did a quick unedited photo shoot with the field and the Terrace together with some members of the 101st Airborne Division.

WW2 Normandy Terrace
The Terrace and the field

Knights of Dice Letters Home Normandy
I like things heavily weathered and dirty

Wargame WW2 Terrace Normandy
Knights of Dice Letters Home Normandy Terrace 1

WW2 Normandy Terrace

The acrylic caulk field, needs to be flattened out a bit more

101st Airborne Photoshoot

101st Airborne Miniatures
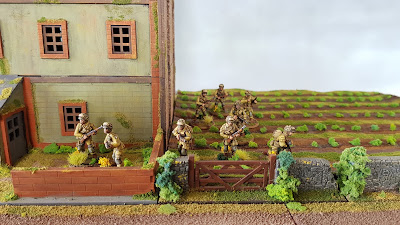
Offensive Miniatures 28mm US Airborne Paratroopers

Offensive Miniatures Paratroopers


28mm US Airborne Paratroopers Normandy

Offensive Miniatures Elite