Here is my recipe for painting World War 2 Polish Soldiers. This tutorial/guide is about 90% historically accurate. Apologies for the varying photography but you get the idea. I will go into specific techniques as we go. I got this recipe from a multitude of sources. I would consider this my tabletop standard. I use a mixture of paint brands. Substitute other brands or shades if you do not have what I recommend.
 |
| I use an airbrush to undercoat them Black with Vallejo Surface Primer |
STEP 1 - BASECOATING
I use a wet pallet. I do not thin the paint too much for the basecoat. I just slap it on. As you can see its not the neatest of jobs however the process I use allows you to cover and fix your mistakes as I go. Basecoating is the longest stage in my tutorial. Dont worry too much at first, just get the paint on. Its my least favorite part of painting.
 |
| Uniform - Green Brown |
 |
| Backpack - Khaki |
 |
| Boots, Bedroll, Straps - German Camo Brown |
 |
| Helmet, Mess-kit, Entrenching Tool Shaft - Cam Olive Green |
 |
| Ankles Straps, Bedroll Straps - US Field Drab |
 |
| Rifle, Entrenching Tool Handle and Top, Pouches - Flat Brown |
 |
| Bread Bag, Bag and straps - Green Grey |
 |
| Skin 1st Coat - AK Base Flesh |
 |
| Skin Second Coat - AK Light Flesh |
STEP 2 - WASH
Don't be shy. Get it all over the figure. Please note I use an ink, not the Army Painter Dip. It takes about an hour to dry properly.
 |
| Wash the Whole Model - Army Painter Strong Ink |
STEP 3 - HIGHLIGHTING AND DETAILS
Thin your paints! With a wet pallet this occurs naturally however you don't want thick paint for highlighting.
For the eyes I use the raccoon method (well thats what I call it). Easiest way to describe it is thin your paints. Draw a black line where the eye is. Then draw a very small white line over the black line. Then use black and paint a little pupil. Its best to go from top to bottom with the pupil. You can then use base flesh to close the eye in and reduce the black outline.
Blacklining is done to make the miniature pop. Use thinned black paint and a small brush to do this. I usually black line equipment, uniforms, straps etc.
For the Helmet I chip it with a sponge. Use a small bit of sponge. Dab some black paint on it. Dab most of it off on a paper towel then apply to the helmet. I then use Green Grey to create scratches etc with a fine brush.
 |
| Apply all base colours as highlights over the raised areas. Don't do the skin. |
 |
| Paint the Eyes |
 |
| Fix up the eyes and reduce the black eyeliner with AK - Base Flesh |
 |
| Highlight the Skin with AK - Light Flesh |
 |
| Lips Are Done With AK Shadow Flesh. Skin Highlights done with AK Highlight Flesh |
 |
| Rifles, Entrenching Tool Wooden Handle Highlights - Orange Brown |
 |
| Pick out parts of the rifle - Gun Metal |
 |
| Pick out details such as cap badges, buttons etc |
 |
| Blackline Uniform, straps and equipment |
 |
| Helmet is chipped, base is painted Flat Brown, Drybrushed Khaki, Base Rim US Field Drab |
STEP 4 - VARNISHING AND BASING
I use the airbrush here. I use Polyurethane matt varnish or gloss varnish first. This is nice and thick and gives a good layer of protection. It will be shiny tho!.
Once dry I use a variety of flock and basing materials to create that Polish Summer/Autumn theme!
Once that is dry I finish it off with Matt Acrylic Varnish to dull out the shine and seal in the flock.
 |
| Vallejo Polyurethane Matt Varnish applied - Note it is not quite matt and is shiny |
 |
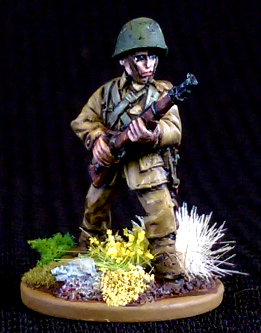
| Miniatures are based with Flock and other goodness. Sprayed with Matt Varnish |
So there you go. All up it took about 3 hours to paint these three miniatures. Its not going to be the best way to paint but its what I consider my tabletop standard. Here is the finished result. Enjoy.
 |
| Get to the front soldier! |
 |
| At the ready. |
 |
| Reloading. |


Very very nice painting guide!
ReplyDeleteWill the colour Green Brown + wash work for soviet infantry as well? I was thinking of using your paint guide for my Russians.
Thanks. Yes it will. Strong tone ink is great for all WW2 uniform colours!
Delete... although they were on the opposite sides.
ReplyDeleteNice tuto and wonderful job!
ReplyDeleteNice bro!
ReplyDeletethanks!
DeleteNice minatures, but the paints aren't historically accurate. The Polish uniforms wz 36 were Dark brown-green. That paint you use is a very light brown.
ReplyDeleteThey look great on the table and that's what matters the most for me
DeleteCan i use Oak Brown for Rifle, Entrenching Tool Handle and Top, Pouches? Or will it look inaccurate and bad
ReplyDeleteI think just go for whatever you think looks best
Delete