Napoleonics? For those of you who follow me on twitter you have seen this new and fascinating period pop up in my feed. I thought the day would never come, yet alone feign any interest in the subject however it is slowly getting me hooked.
I will go into my decision to start Napoleonics as I paint up some infantry. Napoleonics is extremely new to me and I am learning ever so much. The whole rank and file thing is new to me! Without over thinking what forces I wanted I simply went for the rule of cool and really liked the look of Warlord's Polish (an obvious choice) Vistula Legion and Perry Miniature's Austrian Plastics. They just look so good!
The next drama I had with my new adventure is how on earth do I base these guys. There are loads of good resources online however I decided to utilise my 3D Printer and take advantage of some of the great designs on thingiverse. I decided not to go with MDF or anything commercially available. I love tinkering with my 3D Printer.
I decided to go with 20mm bases. This allows me a lot of flexibility and I can customise and use these trays for a variety of systems. Please note the files I have used to print are not my own and links have been provided.
Here is the final result and this article will discuss how I got there...
 |
| Warlord Polish Vistula Legion Left, Perry Austrians Right |
The Files
There is a brilliant set of movement trays available here. The beauty about this file set is it gives you so many options for movement trays, anything from a 1x1 to a 10x10! This will not limit me at all and can use these trays for a variety of rule sets and genres. I decided to do my test print with a 4x4 setup. Of note the 4x4 tile comes in at 41.9mm x 41.9mm. This is great and certainly not as big and clunky as MDF would be.
Here is a sample of the 8x2 file:
 |
| Cura Slicer |
The next challenge was finding bases suitable to fit the movement trays. I used a calibration cube and re-scaled it in Cura (my slicing software). Here is the calibration cube I used. It was pretty easy to resize it to 20x20x2mm. I like the 2mm thickness of the base, not too thin and not too chunky. It is also very strong and durable.
I played with a whole lot of prototypes that failed! Below is some of my concept stuff that just didn't work. I used square magnetic inserts, 1mm tall bases and butchered minis but successfully repaired a couple of test miniatures. I will not go into this too much. Here is some of the prototypes.
 |
| Prototype |
 |
| Experimenting |
 |
| More Experiments |
| Failed experiments |
After a couple of hours trial and error and trying all sorts of techniques and combinations, the following is what I came up with:
First things first I printed off a nice new 4 x 4 Movement tray and 4 bases.
 |
| Fresh bases printed |
 |
| Fresh Movement tray and some bases |
I sanded the bases slightly so they were not as tight fitting to allow paint etc to be applied without hopefully rubbing off. Surprisingly the walls of the movement tray are quite durable.
 |
| Bases slightly sanded and fit snugly |
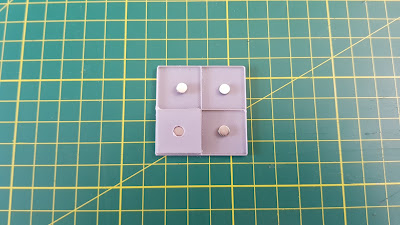
I drilled 4 holes into the movement tray where a 2mm x 1mm rare earth magnet would be fitted. I used a power drill with a 2mm drill bit. The holes only had to be roughly in the middle of each square.
 |
| Holes don't need to be perfectly symmetrical |
 |
| The magnets fit in nice and tight. I did not use superglue |
 |
| 5mm drill bit enlarging the 2mm hole |
I simply dropped the 5mm magnets on top of the 2mm magnets to ensure polarity was correct and consistent.
I place the base over magnets and push down slowly. Once it digs in I remove it and bash it in with a flat object, I used the base of a white board marker. Keep it nice and flush!
 |
| The four magnatised bases in the tray |
 |
| Nice and flush |
I glue the figures straight onto the top of the base with minimal superglue for a nice strong bond. Using some watered down tiling grout and a toothpick I blend the plastic base of the figure into the 3D printed base
 |
| Was most happy with the result |
 |
| Once flocked and static grass applied these should look great |
 |
| Hanging upside down on a metal ruler |
 |
| pushed up against the prototype tray |
Final Thoughts
So this is what I have come up and am pretty happy with the results. It took about 20 minutes to make four bases for one small movement tray however I think I can get this down quicker now I know what I am doing.
I now have the flexibility to not have my figures permanently attached to one movement tray. Storage and transportation is also going to be extremely easy.
For now I will move this to the side whilst I complete my small backlog of whats on my bench which is mostly WW2 stuff. I will then try and come up with a fast yet aesthetically pleasing way of painting all of these troops! That is the real challenge!
Till then...


Very nice idea.
ReplyDeleteMay have to try this as well.
thanks! its a great and versatile system
Deleteoh will be book marking this for sure, thanks for sharing
ReplyDelete