Warlord Games recently released their WW2 plastic multi-part British/Polish Airborne Miniatures in 28mm. The box set gives you the option to create either British Airborne, Polish Airborne or both. These miniatures are ideal for their excellent Bolt Action supplement Campaign Market Garden.
This guide uses simple techniques for maximum effect. This guide can also be adapted to paint British Airborne as the modeled uniform is essentially the same with the exception of the beret.
Vallejo products are majority used however you can look up conversion charts to suppliment what paint range you have. It does not matter if you are a shade or two off.
I break this guide up into the following steps:
1. Preparation
2. Base Coating
3. Quickshade
4. Highlighting
5. Painting the Face and Flesh
6. Advanced Highlighting
7. Finishing touches
8. Varnishing and Basing
Step 1 - Preparation
There are many guides available on how to prepare multi-part plastic miniatures for painting. I simply, clip, glue, remove flash lines, then attach to the base I add some sand and small stones for a nice ground effect. I use Vallejo Black Surface Primer to Prime the miniatures. I like to give the primer a good 12 or so hours to dry for maximum adhesion. You can use an airbrush or brush to prime the miniatures.
 |
| Vallejo 74.602 Black Surface Primer |
Step 2 - Base Coating
Base coating is the longest process I have found in painting miniatures. It is also the most easiest as you can easily fix mistakes. This process is also known as "blocking in" meaning we get all the colours for the miniature down before we apply washes and highlights. The miniatures look pretty dull and bland during this step of the painting, don't worry if they look dull... they will look better as we proceed.
 |
| Smock - Vallejo 70.882 Middlestone |
 |
| Webbing/Pouches/Rifle Straps/Gators - Vallejo 70.988 Khaki |
 |
| Skin - AK Interactive 3012 Light Skin |
 |
| Trousers/Mug/Water Bottle - Vallejo 70.921 English Uniform |
 |
| Helmet/Helmet Straps/Gas Canister/Water Bottle frame - Vallejo 70.924 Russian Uniform WW2 |
After Russian Uniform WW2 is applied I pick out the camo on the helmet with some Khaki.
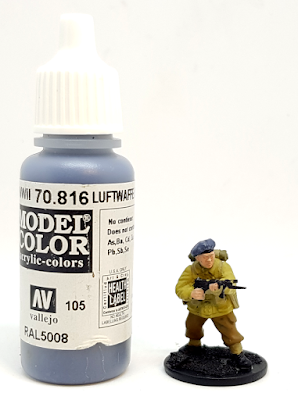 |
| Beret - Vallejo 70.816 Luftwaffe Uniform WW2 |
 |
| Rifle Wood/Equipment Handles/Denison Smock Patch - Vallejo 70.984 Flat Brown |
 |
| Denison Smock Patch - Vallejo 70.979 German Cam Dark Green |
 |
| Toggle Rope - Vallejo 70.819 Iraqi Sand |
With all the colours blocked in I proceeded to paint the base. I used the left over Flat Brown to cover the entire base. I used some Vallejo 70.867 Dark Blue Grey to paint the stones. I paint the rim of the base with Vallejo 70.873 US Field Drab.
 |
| The blocked in miniatures. Rather bland looking. |
Step 3 - Quickshade
After blocking in, give the paint a good hour or more to cure. Once this is done we use The Army Painter Quickshade. I use Strong Tone. I can't recommend this stuff enough. It protects the miniature with a hard coat of glossy varnish whilst shading the figure.
I use a brush to apply it. Use an old thick brush. I am most generous when I apply it. I let it sit on the miniature for about a minute or two and then I dab off the pooling areas with a the same brush.
Alternately you can use the Army Painter Strong Tone ink or a similar product by another manufacturer.
 |
| The Army Painter - Quickshade Strong Tone |
You can see in the above photo the miniatures are very glossy. This glossiness is not ideal to move onto our next step.
Please allow a minimum of 48 hours for the quickshade to cure! I wait 3 days.
Once the quickshade is cured, I use a Matt Varnish to dull out the gloss and give a better surface for highlighting.
 |
| Use Matt Varnish once the quickshade is dry - Vallejo 26.518 |
Step 4 - Highlighting
Now the fun begins. What I do here is reuse all the same colours I used to block in with a couple of exceptions. I use different colours for the Denison Smock Patches which I will show below. I do not bother highlighting anything black - eg the boots as the quickshade gives them a nice worn effect.
The trick to highlighting is to really thin your paints to that nice milky consistency and just apply small translucent layers until you achieve the look you want.
Once we have highlighted what we have blocked in, we can move on.
 |
| Denison Smock Patches - Vallejo 70.826 German Cam Brown and 70.894 Cam Olive Green |
 |
| Beret - Vallejo 70.964 Field Blue |
Step 5 - Painting The Face and Flesh
Painting a 28mm miniature's face is easy to learn but difficult to master. The way I approach it is as follows:
1. Block the eyes in with a thick black line
2. Draw a white line slightly smaller over this black line with white or ivory
3. Draw a small line downwards through the centre of the eye with black.
4. Use a dark flesh colour to reduce the area of the black around the eyes.
5. Highlight the skin (there are lots of good guides out there on how to do this)
6. I use a deep red for the lips.
Practice Makes Perfect! Skip the eyes if you want.
 |
| Don't worry about the Panda Eye Effect initially |
 |
| Reduce the Panda Eye Effect and Highlight the Skin |
 |
| Flesh Tones - AK Interactive 3011 Base Flesh, 3012 Light Flesh, 3013 Highlight Flesh, 3014 Shadow Flesh (for lips) |
Step 6 - Advanced Highlighting
Here we take it to the next level. You can skip this step if you like however it does not take long. What we want to do here is thin our paint even more and introduce a lighter shade to the colours we used in Step 4. I use Vallejo 70.918 Ivory to do this. You could use a similar shade, I find it is much better than plain white.
We want to highlight the trousers, and khaki predominantly. I didnt bother with the Denison Smock at this stage as it may look "too busy" at this scale. However saying this a slight highlight of Khaki on the Denison Smock looks very nice. We take the wooden components up another highlight.
 |
| Pick out small details with Ivory mixed into our highlight colours |
 |
| Rifle Wood Grain, Wooden Handles - Vallejo 70.981 Orange Brown |
Step 7 - Finishing Touches
Black lining is an advanced technique that really makes things pop. To black line I thin black paint and use a very fine brush. I draw a slight edge or line underneath or around an object. I like to black line where the uniform meets another part of the model - eg hands, pants etc and the khaki straps. I also black line the bottom of the toggle rope and black off the metal parts of the rifle.
On the Sub Machine gun pouches I like to add little buttons. First I do a small blob of black topped with an even smaller blob of ivory or white. I slightly black line the spaces in between the pouches.
 |
| Black Lining and weapons - Vallejo 70.950 Black - note the ammo pouch buttons |
After this I then go over the rim of the base with US Field Drab to make it look nice and clean.
 |
| Base Rim - Vallejo 70.873 US Field Drab |
The last thing we want to paint is metallic highlights on metal surfaces, the beret badge and weapons. Two key points here. Firstly, less is more and secondly use this paint last as it will contaminate your brush and water with metallic flakes. To do the beret badge I first paint it black then pick out the detail with Gunmetal.
 |
| Less is more! Beret Badge, Metal bits, Weapon Highlights - Vallejo 70.863 Gunmetal |
Step 8 - Varnishing and Basing
I use a rather different way when it comes to this. The first thing I do is spray or brush on a thin coat of Gloss Varnish over everything. Gloss Varnish is super tough and will protect all those nice highlights.
Once this is dry, usually after about 2 hours I will add basing material. This can be whatever theme you are going for. I used white flowers with some flock and some clump foliage I made.
Once this is dry I then spray or brush on a Matt Varnish to get rid of the gloss varnish and to seal the basing materials in...
... and finally I use AK Interactive Ultimate Matte Varnish. This product is exceptionally good and will give you a very flat and smooth finish. The miniatures look and feel lovely!
 |
| Gloss Varnish Vallejo 26.517, basing materials, Matt Varnish Vallejo 26.518 then finish with AK 183 |
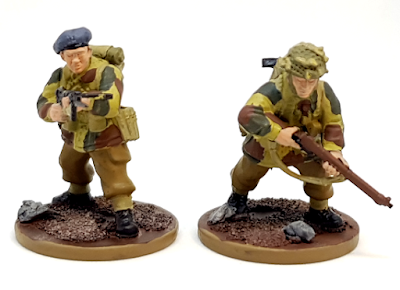
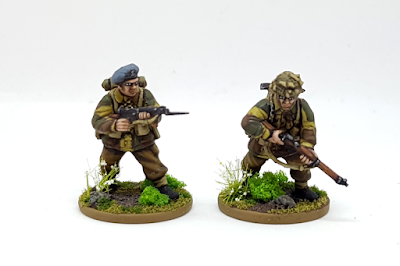 |
| The finished Product |
 |
| Polish Paratroopers |
So there you have it! Some great looking miniatures in 8 simple steps. I found this is the most efficient way of painting miniatures for the table top that really stand out from the rest. With practice you can get to a standard you are happy with. Don't be disheartened if you are not entirely satisfied with what you produce. Just remember that it is one less figure to paint and it certainly beats an unpainted figure!
Thanks for taking the time to read this guide. Hopefully you will have a Paratrooper force painted up in no time! Any questions you can reach me here on on
twitter.
 |
| 28mm Polish Airborne by Warlord Games |


